Pages

Showing posts with label How To. Show all posts

Monday, June 11, 2012

How To Peel a Crawfish

This is where Cabbage feels right at home...  A big, steaming pile of crawfish, boiled with new potatoes and corn, spiced with Old Bay and just waiting for his attack.  I've never seen anyone peel crawfish as quickly as he can.  It may be partly due to the years he spent going to college in Louisiana, but I think it's more that he has a natural-born talent.  Crawfish peeling is his calling.


Me?  Notsomuch.  I like crawfish, but I don't love them.  Sure, they're tender, buttery, and taste like lobster or good crab.  I like the tactile experience of peeling them, and I enjoy eating them at newspaper-covered tables with a cold beer and lots of friends.  When I say I like them, I do.  Like.  But Cabbage?  He's another story.  He L.O.V.E.S. them.  Can't get enough of the little mudbuds.  So when our local grocery store had a nice fresh batch in, I told him I was up for it.  

Turns out I was, but Bean (my belly passenger) wasn't.  I occasionally have shellfish aversions when pregnant, and this was one of those days.  So I opted out of shellfish and into some leftover spaghetti. 

After watching Cabbage go all Tasmanian devil on the little crustaceans (a sight which is not for the faint of heart), it dawned on me that he should pass on his knowledge.

Enlighten the world.

And distract me from the gestationally-induced squeamishness leading me to question if I could stay in the same room with the crawfish one. more. minute.

My semi-pro shellfish sheller husband put it in slow-mo to give the rest of us (me) a tutorial on peeling crawfish.

Allow me to introduce our model.  He's just been cooked to a reddish orange and he's ready to be eaten.  See how he's whole, and the tail curled is under?  That's good.  Don't eat crawfish that come out of the pot in pieces, and don't eat ones with straight tails as they may not be fresh. 


Pick up your crawfish (you can do it), and grasp the body in your left hand, tail in your right.  The tail meat is your primary target.

 
With a pulling and slight twisting motion, pull the tail off the body.


You have about three options with the body in your left hand:
1. Suck the juices and orange fat out.  Foodies love this- it's where the intense flavor is.
2. Crack the claws open like you would a crab and eat the yummy meat there.  These were too small to bother with, but with larger crawfish it's definitely time well spent.
3. Throw it away.


To peel the tail, grasp the end between your right thumb and forefinger, and using your left hand lift the orange tail shell back one section at a time, just like you're peeling an orange.


After a section or two, gently pull the meat out with your left hand while the right still holds on at the base of the shell.  The trick is to kind of anchor the shell with the tip of your thumb, while the left hand pulls.  Sometimes you'll just get part of the tail out, but with a little practice the whole tail should come free in one nice piece.


Eat that luscious little piece of sweet meat!  Dunk it in butter, drizzle it with lemon, or just enjoy it as-is.  Delicious. 

Soon you'll be a semi-pro like Cabbage, and you'll have a pile of discarded shells in a huge glass mixing bowl next to your plate.  This what he ate by himself at warp speed.  See the beer can peeking out from the back?  That'll give you a sense of scale.


...And then he went back for seconds and thirds.  I wish I was kidding, but I'm not.  He's a freak of nature. 

I hope you try out your brushed-up technique soon.  Enjoy!

Monday, April 30, 2012

Kid's Table Makeover

A few months ago I bought this little play table and chair for Beep at a garage sale.  It was worn and faded, marked up and pretty dirty.  It was also just the right size for her, and she's obsessed with Beep-sized furniture these days.  Plus, it was only $2.00.  Sold!


Since then it's been stuffed in our garage waiting for some attention and milling around in the back of my mind.  I could just picture her playing at it somewhere in our house or on the back porch.  I didn't really want it looking so shabby, though, and the colors were pretty awful.  I remembered hearing something about spray paint for plastic, so this Saturday we headed out to Lowe's.


I bought two cans of Valspar spray paint for plastic in colors that were both kid-appropriate and would coordinate in our home.  Back home again, according to the paint experts at Lowe's, I scrubbed the heck outta that dirty little set, let it completely dry, and then got busy painting.  Several thin and even coats of  spray paint later (done outside while wearing a mask), I was done painting and I called it a day to let the paint cure overnight.  (May I add that my index finger is practically numb today from working the spray trigger?  Color me wimpy.)

Today, when Beep and I got home I snuck out ahead of her and moved it onto the porch for the big reveal.


Cute, right?  $2.00 for the table and chair, plus $12.00 of spray paint for a grand total of $14.00 and one happy toddler. 


Beep was pretty excited about trying it out... until she heard Cabbage's truck pull up in the drive. 

Then she was off for some father-daughter bonding time, and I realized our photo op was over.  But it's all good.  She'll be back, crayons in hand.

Let's look at the before and after again.


I'm happy with the results, and I hope it will hold up well (but I'll let you know if it doesn't).  So there you go- a quick makeover for a garage sale find, and the result is a quick and kid-friendly set that will blend in almost anywhere in our house. Success!  

Have you guys ever tried this wondrous spray paint for plastic?  What's your latest DIY adventure?  What is this obsession with mini-me furniture?    

Tuesday, April 24, 2012

A Fence for Tabor

After almost two months of seeing our doe, Tabor, only on the wrong side of our property line, she is finally home.

As an aside, I think I have a greater appreciation for what Amish parents must go through when their kids leave for their rumspringa. 

So what I'm saying is, Tabor may be Amish. 

Anyway, over the past weeks her band of fairweather friends moved on (I told her it would never last/they weren't any good for her/we knew better).  She wandered the property in back of Cabbage Ranch, usually by herself.  She seemed fine and as her belly grew larger with her baby she visited more frequently.

As time passed she allowed closer contact and eventually Cabbage was able to feed her from his hand again, then pet her.  Within the last week my toddler, Beep, and I were able to visit with her at feeding time, and I was reassured that she was still the same sweet little deer.  Tabor was happy to be petted, happy to eat corn from our hands, and even tolerated Beep's hollering, baby pats on her forehead, and bucket-shaking antics.  That made me all the more certain she was ready and able to come back home. 

Our back fenceline stretches long and tight, paneled with wire and without a single gate.  Tabor has never been confident in her jumping abilities, but that's been especially true since she injured a hind leg two years ago and suffered some permanent tendon damage.  Jumping the fence wasn't a safe option for her, and she was still refusing to cross the fence where Cabbage had lowered it.  There, it was plenty low enough for her to hop over but she was wary of it... She's a deer.

Finally, on Saturday evening, we stood along the back fenceline as I fed and stroked Tabor.  I looked at the lowered fence, then at Tabor, and back at the fence.  Cabbage knew what I was thinking, and chuckled.  But I resisted the temptation to try to shove her over it, knowing she was very fast and strong, and my odds of success were about nil. 

I asked about putting a gate in, or cutting the fence, or... something... "Can't we just help her out?  She seems ready to come home."

Cabbage had obviously been thinking the same thing.  He ran through a few options that would allow us to create an opening in the fenceline without compromising the whole dang stretch of wire, and finally hit on an idea that made sense to him.

Sunday morning we headed to Lowes, got supplies, and he got busy sawing and drilling and clamping.  Beep and I napped, because I'm a good helper like that and on the weekends I have the sleep schedule of a toddler. 

When he was done, Cabbage had made a sturdy little braced frame just wide enough for a deer to walk through.  Once it was installed he cut the fence and bound it back to the frame.  The deer portal was ready.

Two hours later Tabor came up for her feeding and happily wandered through.  She was back on Cabbage Ranch.  She had, perhaps, been waiting for a gate all along.

We're a little slow, but we catch on eventually. 

Now we are just letting Tabor settle back in, get reacquainted with her two-year old daughter, Abby, and relax before she has her fawn(s).  We hope she'll stay and fall easily back into her old routines, but if she ever does need help getting back through the fenceline again, we now have her little doorway.  It's a fence built for Tabor.        

 Cabbage's fence brace along the back property line

The fence brace (closed with a piece of wire panel) after Tabor came home 

 Do you see our little deer in this picture?

 Beep is happy to have Tabor home, too

The End (for now)


Friday, December 2, 2011

Dishwasher. Reborn.

When we bought our house- or to be more exact, when we bought Cabbage Ranch- it was really a dream come true.  A few acres in a nice neighborhood, a little shop to make into a barn, and a spacious family house.  Yes and please.

Our home was built in the 70s, and had a pretty decent renovation sometime along the way.  Although it's all a bit dated now, those updates included some really thoughtful upgrades to the kitchen cabinets.  The appliances were less than stellar, though, and the fridge was not included with the property. 

When we shopped for appliances, I knew I wanted black.  I'd chosen black appliances in my previous home in Colorado, and I loved them.  Stainless was too expensive and prone to fingerprints... White was not my thing. 

When we bought our fridge, Lowe's was running a great special, so we opted to also get a new stove (the old one was scary!). 

We did not buy a new microwave or dishwasher... The existing ones were white but worked fine, and it wasn't a necessity.  We figured it wouldn't be hard to save for new ones in a year or two. 

Four years, one baby and a pile of horse bills later, we still have a checkerboard of kitchen appliances.  But I've gotten used to my black/white appliance mash-up.  No biggie.

However.  It just hit me that the "hopefully someday" black appliances were still too far off and I couldn't stand it anymore.

What to do about the big, huge, glaringly white dishwasher?


I know that with the right primer you can cover just about anything. 

So this is my extremely long and wordy way of telling you I painted my dishwasher.  I primed it and painted it black.

WITH CHALKBOARD PAINT.

Am I brilliant?  Am I a total whack-job?  Will it really work?  Nobody knows...

And by nobody I mean me. 

I figured it would be the perfect place to have Beep play while I get dinner going, and any stray chalk dust will be easy to wipe up from the (wretched pink) tile floor.

So here's how I did it. 

I bought a quart of deep base, all-purpose, super duper primer.  I carefully cleaned the dishwasher, got out my trustiest paintbrush, and painted the main panel and sides.  I paint enough that I have a steady hand and I didn't tape, but the primer was verrrrry drippy so I definitely needed floor protection.


I left the top part for last because it required the most detail work, and I wouldn't be able to open or close the unit when it was wet.


I rocked it out carefully cut in around the edges. 


And around the front, always watching for those pesky drips.


Then I started on the vent.


A little time, and careful work with a steady hand around the control panel, and it was primed!


We then left the house to allow it to dry... And went to a local festival, where my baby proceeded to eat corn on the cob like the Midwesterner she is (by proxy).


Look at those maniac eyes. 


After we got home I put a coat of paint on.  This part is not documented because 1. it exactly mirrored the steps above, and 2. my photographer (Cabbage) deserted me and my nutso project and went to bed. 

I followed up with a second coat a few days later. 

Finished product! 


There's no way around the white control panel, unfortunately, but we now have a (mostly) black dishwasher that coordinates a lot better with our other black appliances.  Hooray!

It's been about three weeks since I painted it, and so far it's holding up perfectly.  I haven't introduced Beep to its magical chalk powers yet... mainly because I haven't bought chalk.

Now I have a mostly-full quart of chalkboard paint, and I'm wondering what else will fall victim to my paintbrush. 

What projects have you been working on lately?  Any ideas on what I should chalkboard next?

I just made a noun into a verb and my day is complete.  Over and out.


Tuesday, November 22, 2011

My Favorite Horse Sheet

Hello, friends.


This horse is no blanket-fitting expert.  One look at his shag reveals his love of cold weather and his longing for snowdrifts and snow angels.


Oh, wait.  That's me.  (Not the shag part, the cold weather/snow angel thing.) 

Well, I'm not a blanket-fitting expert either.  But really, I don't know any expert blanket-fitters.  If I did, I would submit, for his/her approval, this (hairy) (whiskery) (maniac) (complex) (spoiled) horse.


Unlike my first horse, Sam likes wearing his blankets and sheets.  But that doesn't mean he treats them with respect.  On the contrary, he's very, very hard on them and seems on a never-ending quest to test their endurance.  It's these kinds of dichotomies that make him complicated.  They also make him expensive.

How does he destroy sheets?  Let me count the ways.
He gallops at top speed in close proximity to fences.  *Rrrrrrrrrip*
He rolls wildly and catches feet under clasps.  *Ping*
Tussling with friends across the fence, he actually encourages them to tug and pull on his clothes.  *Schuck*

Despite my best efforts to patch Sam's clothes with a sewing machine, and my willingness to let him wander around in rags, his blatant disregard for clothing has led me to purchase a number of sheets.  So maybe I'm an amateur blanket-selector. 

These are the features I believe are most important for a good horse sheet.  They make for a good sheet for my leetle friend, and I'm sure they will for yours, too.

Fit
After properly measuring him from chest to tail, I know that he wears an 84.  This is larger than most horses, and an 80 is often a good middle-of-the-road size.  Still, though, it's always best to measure your horse, and it never hurts to ask a salesperson if a sheet runs large or small. 

The sheet below by Riders International has been my perennial favorite, and although I can't find the exact same sheet online right now, it's pretty close to this one.  At about $90, it's reasonably priced and readily available online.  No, I haven't been compensated for this post.  I just like this sheet. 

The fit on Sam, below, is pretty decent.  You can see that it sits up in front of his shoulders, and the opening for his neck is appropriately sized- meaning it's not pulling at his neck or slipping behind the point of his shoulder. 

The sheet settles well over his body with some room to spare, and you can just barely see his (beer) belly poking out below.  Behind, the tail flap gives extra coverage and the edges of the sheet nicely cover his hip. 


I will fault the fit of this sheet for pulling at the point of his shoulders near his chest.  I've learned, however, that because of the way he's built, all sheets fit him that way.  To keep his clothes from rubbing his hair off, I use a shoulder guard.

Fabric
Why has this sheet earned my unending love?  First of all, it's made of 600+ denier ripstop nylon.  Although we all love Egyptian cotton bedsheets, when it comes to horse sheets, nylon is a far better choice.  Cotton is cold when wet, dries slowly, mildews, rips and frays.  Nylon dries quickly, resists mildew, is lightweight, and comes in wonderful high-tech variations like my beloved ripstop. 

Now, about denier.  Denier refers to how fine and tightly woven a fabric is.  The higher the denier count, the more durable it is.  See those little pricked holes below?  On another sheet those would be full-fledged rips.  Foiled again, Sam. 


Although it's breathable, this sheet is also backed with a weatherproofing layer, which makes it extra water-resistant.  This is less important if your horse has limited turnout or constant care.  And by "constant" I mean "a butler at his beck and call to ensure he never gets caught by a sudden rainstorm." 

It's also machine washable, and does fit well in a traditional washing machine.  I run it through at least twice, then hang it on the fence to dry in the sun.  (Cabbage and I have an old washing machine in our barn dedicated to horse laundry.  On the rare occasion I do opt to throw some wraps or a saddle pad in the machine in the house, I always wipe it out afterwards with a paper towel, then follow with a load of jeans.  To be honest, I'm not sure horse laundry is any dirtier than our jeans, anyway. Urgh.)

Lightweight?  Check.  Perfect for wearing alone or under a blanket.
Ripstop?  Check.  Have mercy, Sam.
Rain resistant?  Check.  I don't worry if he gets rained on.  Boyfriend will stay pretty dry.

Features
Let's zoom in on additional features.  I like a sheet that opens across the chest, because it gives options and adjustability.  This one is great because it first velcros to itself, then has a choice of two clips, and further adjusts with buckles.  If you can't get this to fit, your horse is built weird.  Like mine.


Shoulder gussets (the extra triangular pleat of fabric shown below) are good because they allow freedom of movement.  This is particularly important if your horse likes to gallop around like an idiot.  Ahem.


Below his belly are two straps which are meant to cross underneath and hold it securely in place.  Good stuff.  Some sheets come with just one strap that goes straight across behind the front legs, and that works... But two are better than one.


It's ok to post pictures of my horse's hiney, right?  I'm a little fuzzy on just how perverted some people can be. 

Moving right along...  Underneath that awesome tail flap are two elastic leg straps.  They are hold the sheet close to each leg and keep the back half of the sheet from sliding and shifting around his (we'll call it) waist.  I've always preferred to cross the leg straps, so the left leg strap crosses to the back of the right leg, and vice versa.  The X makes sure they hold the sheet not only to each leg, but also to the other side.  Ta.  Da.


And there you have a quick rundown of features worth paying for in a good horse sheet.  Sam tested and approved.


Wednesday, November 16, 2011

Gnome Halloween Costume: DIY

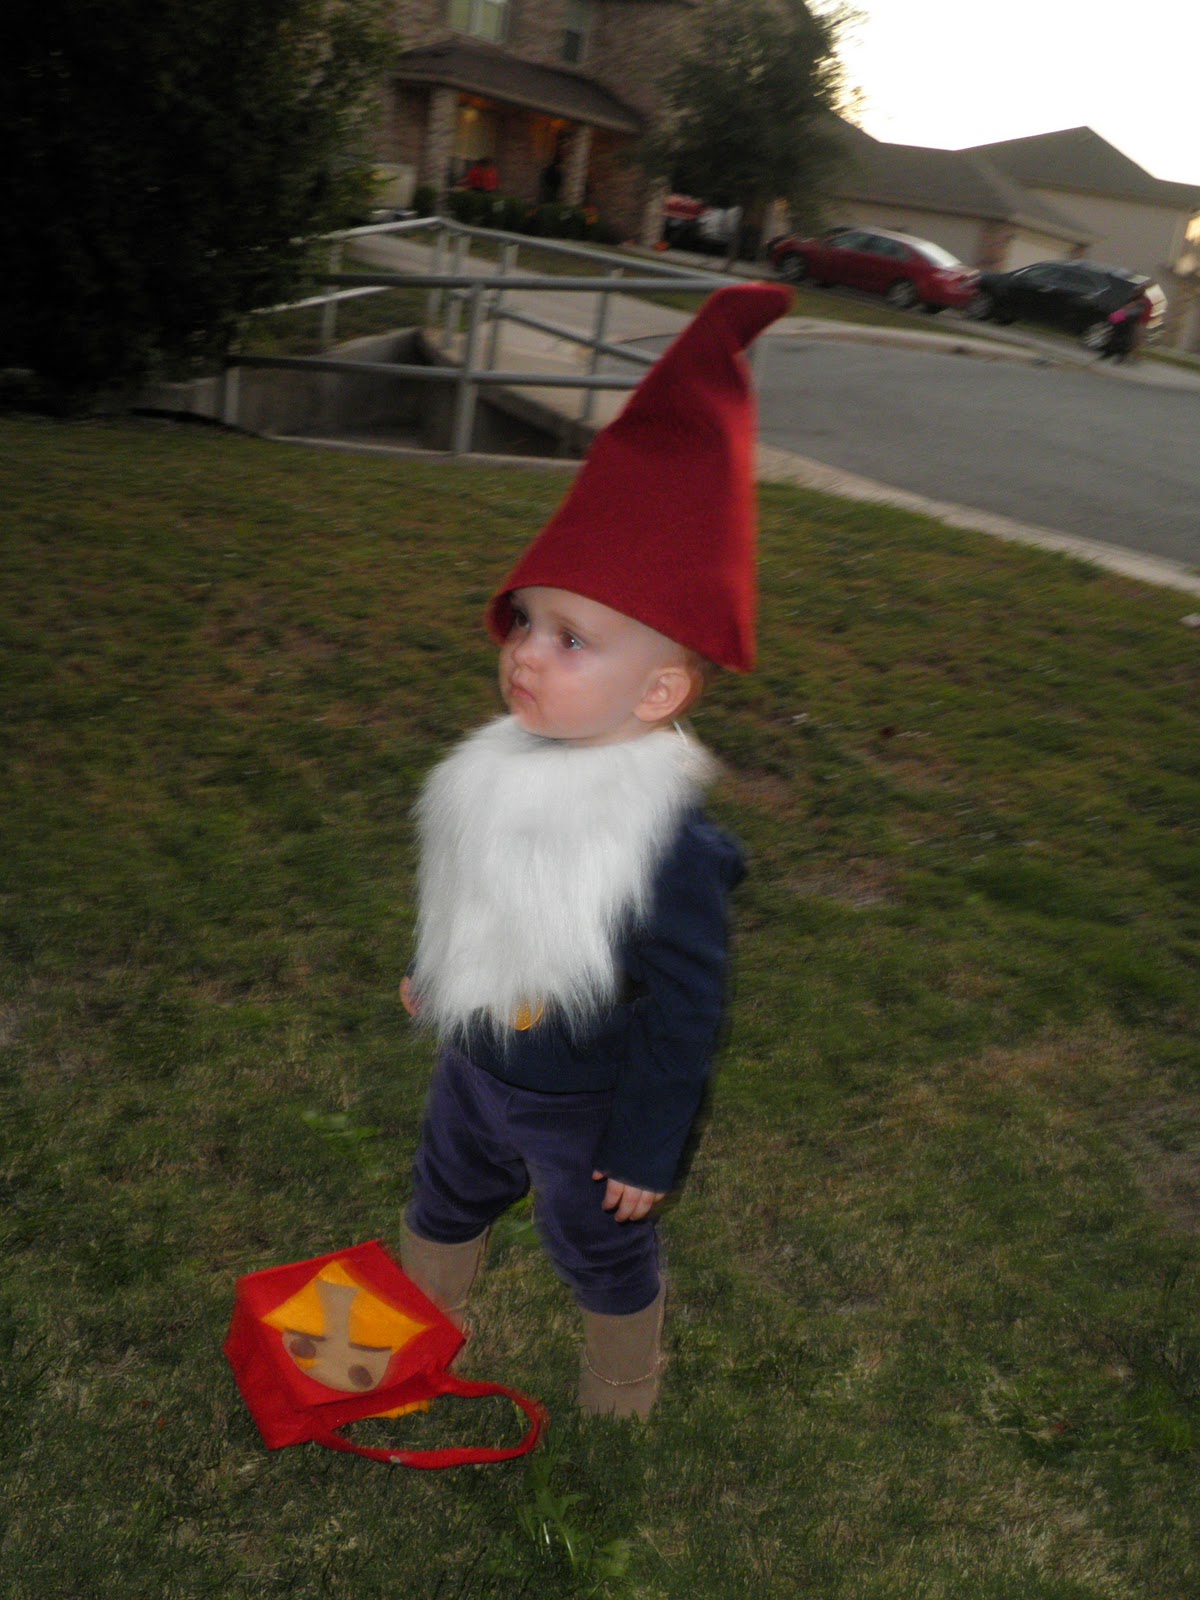
Turn your baby into a gnome.  It's the right thing to do.

We have children for the purpose of amusing ourselves...right?  

The gnome costume is easy and inexpensive to make, and comfortable for your baby to wear.  Three cheers for gnomes!

Oh- and if you haven't yet chosen a husband, please do yourself a favor.  Select someone who would do this.


You need a man who will wear a cowboy hat as he measures and cuts a gnome hat.  Trust me on this.  Because only that guy could talk you down from The Cliff of Overwhelmed.  And only that guy could help you make sense of a costume that exists... mostly in your head.

Following some instructions found here, your beloved will patiently measure, mark and cut.  This is a better method than yours, which involves wildly hacking and guessing, then growling at bad results.


 If you picked a really good one he'll try on the hat.  And let you take pictures for your blog.


So matchmaking and husband-selecting aside, let's talk about gnome costumes.

Supplies
Square piece of red felt about 18 inches square
Tape measure
Glue gun
Marker
12 inch square of white fake fur
24 inches white elastic
Small treat bag plus felt scraps
Blue longsleeved shirt
Dark leggings
Boots
Belt with large buckle (or a piece of wide black elastic and a piece of yellow craft foam)

Assemble your supplies in full view of a jack-o-lantern.


Measure around your child's head, just above the ears where the hat will sit.  Ours measured about 16 inches. 

Then, hold one end of themeasuring  tape in one corner of the felt, and pivot the tape to measure and mark 16 inches (or whatever your measurement is).
 

Then cut along your arc.  Then run a bead of hot glue along one of the straight sides and glue it to the other straight side.  Turn inside out and place on husband.


Try on self.


So the gnome hat is officially done, but I thought it needed a little more gnome flavah.  I pictured a little gnome-ish crinkle at the top, so I slipped my left hand inside and positioned the tip in a foldy little zigzag.


...And glued at the creases.


Niiiiiice.


Now on to the beard.  Fold your white fur in half, and cut a shaggy/zigzagging arrow shape (see below).  Be sure to move the fur around so you don't trim the long hairs when cutting.  Just eyeball the size and shape- it doesn't need to be exact, because 1. gnomes are imperfect by their very nature (I know this, yes I do) and 2. those long hairs you so carefully avoided trimming will hide any imperfections.

Then, cut sort of a gentle half circle at the top to allow the beard to fit under your gnome's chin.

Next, cut three 1-inch slots perpendicular to the top.  One in the middle of the top, and one on either side.  These slots help the beard lie flat during the next step.
 

Place elastic along base of slots, fold beard over elastic, and glue in place.  Trim sides to get rid of overlap if necessary.


Cool.


If you're making your gnome's belt, just measure her waist, and cut a piece of wide black elastic about 2 inches shorter.  Cut a hollow square from your foam craft, then glue the ends of the black elastic to each side of the hollow square. I have no pictures of the belt-making process.  I'm lame.  But you can wing it, trust me.  The belt will end up looking like this. (Rubble family not included)


Finally, if you still have the time and interest, make a small felt bag  into the perfect treat sack.  I found this bag at Target for $1, and covered the snowflakes by gluing on mushrooms... which I fashioned from felt scraps left over from last year's costume.


Finally, enjoy your little gnome!